ForgeUI Tutorial - Let's Generate Images with Forge Using Flux, SD3.5 and LORA's
- justthetipwithdani
- Nov 16, 2024
- 14 min read
Updated: Nov 18, 2024
This is a quick guide on how to generate art using Forge UI.

Head on down to Illyaviel's GitHub for Forge UI https://github.com/lllyasviel/stable-diffusion-webui-forge and scroll down to the INSTALLING FORGE section.
Click on the all in one installer to download the zip file.
Quick Links:
Organize CheckPoints and Loras with SubFolders
NOTE: SD 3.5 does not currently work with ForgeUI as of 11/2024

Right click on the download installer and extract anywhere on your PC. Preferably on a drive that has over 100GB of storage because the models are going to HUGE

As you can see I extracted into the same directory into a folder named ForgeUI
Open up your ForgeUI folder and click on update.bat which is a batch file

When you click on update.bat or any bat file for that matter for the first time you will get the following warning. ForgeUI is widely used but they are not on the Microsoft store and it's not a streamlined product so you will have to click on "MORE INFO" then click on "RUN ANYWAYS"


Once everything is updated you will get the option to "Press Any Key to Continue...
Mine was already up to date but you should have quite a few updates that will take a couple minutes. Press any key to close the cmd prompt.

Now Click on Run.bat and you will get the same warning with the blue boxes saying Windows protected your PC. Click on More info and Run Anyways

A Command Prompt will pop up initializing everything and downloading requirements if it is your first time. Once it is done it will open up Forge on your browser on a tab labeled Stable Diffusion

Your Command Prompt should look something like this. KEEP it open. The cmd interface needs to be open while you use Forge UI. Notice the 127.0.0.1:7860 which is the loopback address 127.0.0.1 followed by the port your PC is using which is 7860. If you run more than one of these at a time it will choose the next port 7861.

You should be looking at ForgeUI Now. If not you can put the following IP address in one of your browsers to open it up 127.0.0.1:7860 you can also hold ctrl and click on the address in your prompt to open it up. This is a good trick if you close it by accident.

Technically your done but you don't have any models that can generate AI Art. So let's get those now.
Before we download models lets take a look at where they will be going.

This is the ForgeUI/WebUI/Models Folders where everything will go.
Lora's go into the Lora Folder, VAE's go into the VAE folder, text encoders & Clips go into the text encoder folder, this will be your Clip-L's and T5xxl's, and last but not least all models like Flux, SDv1.5, SDXL will go into the Stable-Diffusion Folder
Let's start with Flux Text Encoders.
Flux & Flux Text Encoders (Go Back to Top)
•Clips or Text Encoders - comfyanonymous/flux_text_encoders at main


Click on the download icon to start the download for the model but pay attention to the file size as they are quite big. You will have downloaded 50-100GBs by the end of this tutorial.
The only 2 Required Text encoders is the Clip L and one of the t5xxl FP8 models, look at the red arrows above. The scaled version doesn't work for me (on a RTX4070) but feel free to experiment with it. I recommend the standard t5xxl_fp8_e4m3fn.safetensors model. Optional is the FP16 model that's 9.76Gigs which will have the most precision but triple or greater the wait time compared to any of the FP8 models.
VAE
Next is the Flux VAE which is the AE.Safetensors file below. This is needed for Flux generations so grab it from here Flux 1-dev - https://huggingface.co/black-forest-labs/FLUX.1-dev/tree/main which is the main Flux Hugging face repository with the full version of flux FP32 model which we are not grabbing today because it will be super slow unless you have an RTX 3090 or 4090. If you do choose to use the full version of flux grab the flux-1-dev.safetensors and you have all the models you need to run flux. I will be showing you a quicker alternative that allows you to generate at 4 steps with similar precision as the full model.

Flux Model Checkpoints (This is what allows you to make Art)
I will go over several options of Flux but you only need 1 Model! Don't download them all. Just see what the positive and negatives are of each model and choose wisely as they are quite large. The trade off is normally speed for precision vice versa and some models like NF4 and GGUF Q4 will allow older GPU's under 8GB of VRAM to still use flux in a reasonable time ...sort of. It will work which is the most I can say.
If you were to get 1 Flux model I would recommend the Flux Shuttle uses only 4 steps (Fastest Way to generate with Flux) – https://huggingface.co/shuttleai/shuttle-3-diffusion/tree/main


Flux Shuttle which will allow you to generate art with only 4 steps which is similar to lighting models for Stable Diffusion. Typically you would generate with 20-60 steps

You can download the full model from this site Flux 1-dev - https://huggingface.co/black-forest-labs/FLUX.1-dev/tree/main but if you don't have 24GB of VRAM you might be waiting longer than 2-3 minutes generation.
This image was generated with Shuttle 3 Diffusion with 8 steps

What if I have a weaker video Card? (Go Back to Top)
This is where Flux NF4 comes in. If you have a Graphics card with 4-8GB of Vram instead of 12,16 or 24 then Illyasviel’s NF4 Fluxis for you - https://huggingface.co/lllyasviel/flux1-dev-bnb-nf4/tree/main
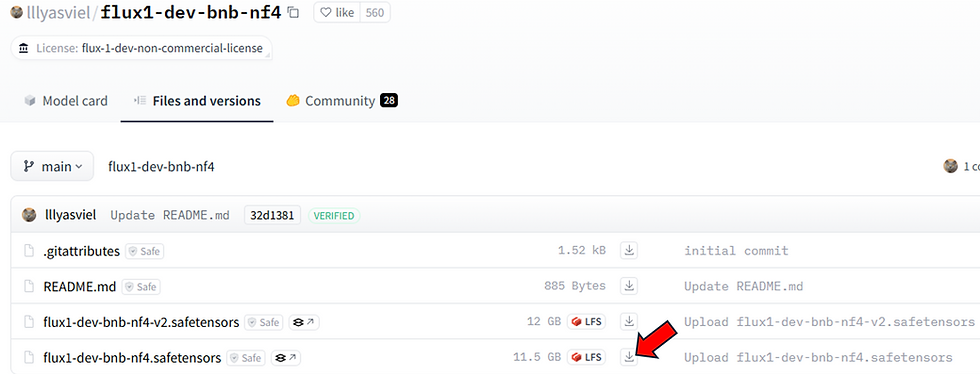
I recommend the version 2 Flux-1-dev-bnb-nf4-v2.safetensors file.
Once you Download the flux mode you want wether it is NF4 of the Flux-1.Dev FP8 or 16 you will put it in the ForgeUI/WebUI/Models/Stable-Diffusion Folder even though it's a flux model. There is no UNET folder in ForgeUI like there is in comfyui. As you can see i created a sub folders for Flux which will better organize ForgeUI when I run the tool.


If you want to learn more about Blackforest Labs the creator of flux or the Flux Pro Paid models check out this site. Blackforest labs or FP32 model - Black Forest Labs - Frontier AI Lab.
You will also find links to the official Flux-1Dev Hugging face models and spaces where you can generate for free to test out Flux-1 Dev
Let's Get some Stable Diffusion Models now! (Go Back to Top)
First let's grab a custom SDXL and SD Version 1.5 model. SD 1.5 is still the go to for custom models as it has the greatest flexibility by far.
NOTE: SD 3.5 does not currently work with ForgeUI as of 11/2024
We will have to start with the VAE's which will accompany some SD Models. Some models have the VAE Built in but it is always good to have them.
SD 1.5, 2.0, 3.0 and 3.5 -- https://huggingface.co/stabilityai/sd-vae-ft-mse-original/tree/main
Oddly and Annoyingly Enough SDXL had a completely different VAE. Remember that SD3.5 does not currently work with Forge UI.

Here is a link for the SDXL VAE - https://huggingface.co/stabilityai/sdxl-vae/tree/main
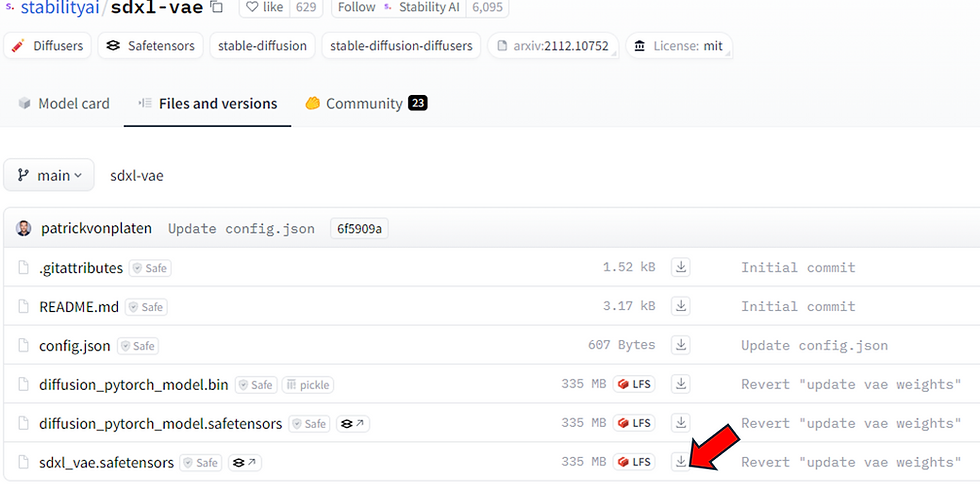
Just download both of them it won't hurt to have them in your repositories.
Let's start with a custom SDv1.5 which is very good for realism Realistic Vision V6.0 B1 - V5.1 Hyper (VAE) | Stable Diffusion Checkpoint | Civitai

V1.5 is still widely used by the community for it's flexibility with custom models so I wouldn't write off older models as they are faster and still have better flexibility for specific art styles you can find on CivitAI
You can filter out your results on civitai to only look for models or Loras or specific artist. I searched for cyberrealistic who has a lot of Lora's that are pretty amazing.

Let's grab this SDXL Model called Jib Mix Realistic and try it out.

Keep in mind lighting and turbo or hyper SDXL models have to generate with specific settings. This usually includes very low steps. Let's look at the instructions for this specific model.

As you can see this generates in 8-35 steps with 2-5 on the CFG and if you use DPM++ SDE you can generate with 4 steps and 2.2 CFG which will make the generation go LIGHTING fast. Hence the name. This should be renders that are under 5-10 seconds for most GPU's.
Now let's grab a normal SDXL Model called Juggernaut XL which is the most popular SDXL Model for it's flexibility and photorealism - Juggernaut XL - Jugg_XI_by_RunDiffusion | Stable Diffusion XL Checkpoint | Civitai

Once you have downloaded these models, place them into the Forgui/Webui/Models/Stable-Diffuion Folder.

As you can see I created subfolders in here for SDXL which I will put my models directly in there to better organize ForgeUI.
Let's get some LORA's! Wait... what is a LORA? (Go Back to Top)
Chat GPT's definition - A LoRA model (Low-Rank Adaptation model) is a specialized model designed to fine-tune large neural networks, particularly transformer-based models, using minimal computational resources and storage. LoRA models are commonly used to adapt large pre-trained models, like those used in text and image generation (e.g., Stable Diffusion), to new tasks or styles without retraining the entire model from scratch.
My Definition - It is a refiner that allows you art to look more like the LORA model or subject. This could be a particular style or the likeness of a person such as
Dark Fantasy Lora - https://civitai.com/models/660112/dark-fantasy-flux1d

Scarlett Johansson Lora - https://civitai.com/models/7468/scarlett-johanssonlora

Very Important!!!!!
once you click on the big blue download button you should rename these (No spaces in the name) to include the type of File i.e. LORA and the Base Model listed on CivitAI i.e. SD15. So for the 2 models above the first one will be DarkFantasy_Lora_Flux1D then the other will be ScarlettJohansson_Lora_SD15. If you don't do this you might get lost one what model it belongs too.
Thats Cool...I Installed ForgeUI, and I Downloaded all these Models, Text Encoders/Clips, VAEs but... Where do I put all this stuff to use it??? (Go Back to Top)
Go into Your ForgeUI Folder Webui/Models/


This is where all the magic happens and 90% of what you install to forge will go. I personally made a short cut of the models folder on my desktop to get here quickly.
Here are the folders we need to look at today

Obviously the Lora's will go into the Lora Folder and Vae's like the Ae.Safetensor and the SD and SDXL Vae's go into the VAE folder.
Not so obvious, all models will go into the stable diffusion folder. This includes the Flux NF4, the Flux Shuttle 3, Flux Dev-1, SD1.5, SD3.5 and any checkpoint or custom model you grab goes into this models/Stable-Diffusion Folder.
The only exception would be Deepbooru, upscalers and diffusers which we are not talking about right now or installing.
PRO TIP!!!!!!!!! (Go Back to Top)
Something you should do is add subfolders for Flux and SD, SDXL models to keep everything organized. This will still work in forge and it will be much easier to organize and find things in the UI and in these folders.
Notice in my Lora Folder

This is how it looks in Forge
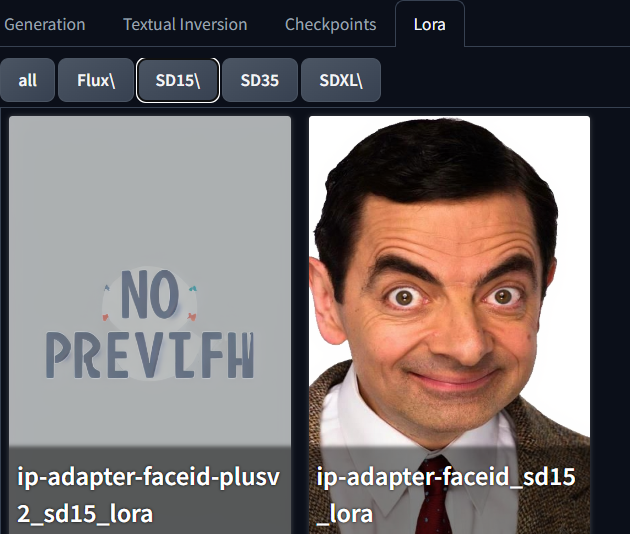
This is how it looks if you make sub folders for your Stable Diffusion folder

I can't tell you how much this helps organize and find things. Just don't put spaces in the names if you need a space add an underscore like this SD3_Animagine.
So long story short. Put your VAE's into the Model/VAE folder, Loras Into the Models/Lora Folder and all checkpoints into your Models/Stable-Diffusion folder even if it is a Flux model ( in ComfyUI it will be your UNET folder)
So the Flux Shuttle, SD3.5, SD1.5 Custom model, GGUF models all go into Models/Stable-Diffusion
Let's Run and Use Forge UI (Go Back to Top)
Alright were all good. I recommend Restarting Forge by closing out the Cmd Prompt if it's running and start ForgeUI up again by clicking on the run.bat file.

Located into the ForgeUI Folder

But if you still have everything open and don't want to do that just press F5 or click on the refresh button which should update everything

Now let's quickly go over the UI on how to use this thing.

You should be looking at something similar to this. If your not, try putting 127.0.0.1:7860 in your browser address bar and pressing enter or restart ForgeUI
Let's focus on the top left

UI
Very important, I always mess this up. The UI has to match the model in your checkpoint. I.e. SD radio button has to be ticked to use Dreamshaper which is a V1.5 model. I should of renamed it V15. I actually had to look it up to match it with the proper Lora.
CheckPoint

Checkpoints will be your actual models such as Flux or Stable Diffusion. Dreamshaper is a custom model for Stable Diffusion that is currently in the check points. When you want to check it just click on the drop down arrow and select your model
Notice I started to put SubFolders inside my models/stable-diffusion folder for Flux, SD15, SD35, SDXL and they show up with the prefix which is very helpful.
It would of been more helpful if i cleaned up the names and identified the base model on models like dreamshaper to show it's a V15 or drop it in the SD15 folder to so it shows that prefix.
VAE/Text Encoder/ CLIP
Perhaps the most difficult part to explain.

Each model requires a specific VAE and text encoders. I showed you models that don't require text encoders which are called CLIPS in ComfyUI but Flux will still require Clip L and T5xxl_FP8_E4m3fn scaled or not scaled (not both) and a ae.safetensor.
There are so many combinations especially with SD3.5 which is why I stuck to the all in one model for my tutorial which you will only have to use the Vae-ft-mse-84000-ema with that model.
Here is an amazing site and cheat sheet found on Forgeui's website the Flux Tutorial 2.

Go to this link for the cheat sheet - https://github.com/lllyasviel/stable-diffusion-webui-forge/discussions/1050
Here is the images from that site


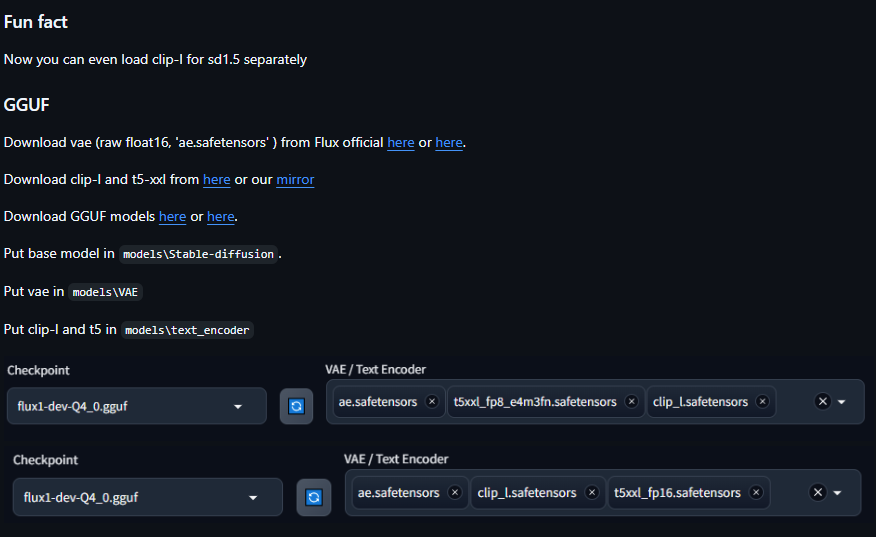
This is an amazing cheat sheet and just come back here or to that site to figure out text encoders.
How do I make art once I have loaded the proper models and text encoders/VAE? (Go Back to Top)

Type something in the top prompt which is your positive prompt or what you want to see in your image and the second prompt is what you don't want to see such as Blurry, disfigured, or make something like helmets.
I typed in
"A fierce woman adorned in intricate ornamental armor stands proudly against a dark, moody background. Rich golds and deep blues accentuate her strength, illuminated by soft, dramatic lighting, oil painting style."
I used this checkpoint and Text Encoder/VAE

Once you typed in what you want click on the big orange generate button.

JUST LIKE THAT! Your image will appear on the right

Let's fix a minor detail
Now annoyingly enough, metal armor seems to always generate metal nipples. I'm sure that might be more comfortable in real life but it's not what we want to see.

If you hover over the icons at the bottom of the image you will get options to send this image to inpainting or image to image. We are clicking the one that looks like the painters palate.

This has brought us into img2img tab and inpainting


You can get there manually by clicking on the tab right above the Positive Prompt and then clicking on inpaint above the image upload box
In here you will get a paint brush to mask out a portion of the image that you want to generate new art.

I made the brush smaller by moving the slider all the way to the right. Very important detail. Scrolling up and down will zoom and zoom out, Ctrl+z will redo and there is also a button in the tool bar when you hover over the pic, and right clicking will allow you to drag the picture around, and the cross icon will center the img.

Notice that I masked out her Nipples and I added Bronze Armor to the positive prompt.
Another thing to take note of is it generated this image with Flux but I am using a SD15 model to inpaint. This will be 20x faster and it already has all the info to copy and just match for that section since it is gathering details from the whole image to replace what's in the mask i created where her nipples are. Don't forget to change the UI to SD instead of Flux if you do this as well.
There is a few things you will need to do before clicking generate.

Notice the arrows at the top for Just Resize, Inpaint Masked, whole picture. Use these settings which should be there by default.
Now the Triangle near the bottom is the most IMPORTANT button you NEED to click or your image will be stretched. Just click this button and it will adjust the ratio of the image currently being inpainted. If you image is squished or stretched, it's because you didn't press this button.
Denoising strength should be at 0.6 to 0.7 and raise it to 1 if you get no change or refresh your UI.
Soft Inpainting is enabled if you want to mesh and object and not destroy the detail around it.
Now you can click on generate and see what you get


As you can see the image was repaired and it in painted new details in the area I erased it with the mask and it used images existing details to copy the textures and color for the bronze armor that I asked for in the area that I masked.
Now let's use a Lora! (Go Back to Top)
Lora's are just clicked and it adds a keyword to your prompt that will call out that particular style.

As you can see I am in text to image with SD selected and dreamshaper a v1.5 model as my checkpoint. I am using the standard VAE and I put "A Cute Cat Girl that's lonely and daydreaming" into the prompt.
Now notice the arrow below where I clicked on the Lora tab to show all the Loras. Because I have subfolders in my Models/Lora Folder I have sections for All, Flux, SD15, SD35 and SDXL those are basically the names of the subfolders.
Now I'm going to click on the Lineart Stylev1.0 and check out what happens in the positive prompt. Just a heads up there are Loras for negative prompts and you should be clicked in the negative prompt before adding it.

Notice my prompt now says "A Cute Cat Girl that's lonely and daydreaming <lora:Lineart_style_v1.0:1>"
The <lora:Lineart_style_v1.0:1> is calling the Lora to completely change the style of the image into a Lineart the :1 at the end is the weight or strength with :1 being 100% ratio and anything below that a lower strength will be used. For example <lora:Lineart_style_v1.0:0.5> has a 0.5 at the end instead of 1 which means it will have a 50% influence instead 100%.
Let's click Generate


Here is the generation without the Lora. A Cute Cat Girl that's lonely and daydreaming

A Cute Cat Girl that's lonely and daydreaming <lora:Sketchy:1> with :1 or 100% Lora

Here is the same thing with 50% Lora Strenth. A Cute Cat Girl that's lonely and daydreaming <lora:Sketchy:0.5>
So it's a mix of the sketch art and the normal art but you can barely tell it's a sketch. So let's raise it to 0.8 which is 80%
A shortcut to do this is holding control and pressing the direction arrow upwards which will increase the number from 0.5 by increments of .05.


This is what it looks like with the Lora at 80% or <lora:Sketchy:0.8> so it's half a drawing sketch and half a normal image that the dreamshaper checkpoint creates.
Now I want to use this image for My Sketch Lora Icon Preview Image ! (Go Back to Top)

Going back to Txt2Img tab with the subtab CheckPoints: if you hover over the Flux-1dev-fp8 model you will get the settings icon that looks like a hammer and a wrench
If you click on it you will go into something that looks like this.


As you can see the Lineart Style icon was replaced with the image I created.

All Links mentioned in this tutorial (Go Back to Top)
Main Site:
Flux Links:
•Clips or Text Encoders - comfyanonymous/flux_text_encoders at main
•Flux Shuttle uses only 4 steps – https://huggingface.co/shuttleai/shuttle-3-diffusion/tree/main
•Illyasviel’s NF4 Flux for weaker Video Cards - https://huggingface.co/lllyasviel/flux1-dev-bnb-nf4/tree/main
•Flux-1 Dev FP8 17gigs! - https://huggingface.co/lllyasviel/flux1_dev/tree/main
•Blackforest labs or FP32 model - Black Forest Labs - Frontier AI Lab
Stable Diffusion Links:
SD Custom Models:
SD 1.5 Realism - https://civitai.com/models/166609/realismbystableyogi?modelVersionId=967230
SD 1.5 Realistic Vision - Realistic Vision V6.0 B1 - V5.1 Hyper (VAE) | Stable Diffusion Checkpoint | Civitai
•SD Cyber realistic - https://civitai.com/search/models?sortBy=models_v9&query=cyberrealistic
SDXL Juggernaut XL - Juggernaut XL - Jugg_XI_by_RunDiffusion | Stable Diffusion XL Checkpoint | Civitai
SDXL Jib Mix Realistic - Jib Mix Realistic XL - v16.0 - Aphrodite | Stable Diffusion XL Checkpoint | Civitai
Lora's and VAE's:
Cyber Realistic Negative - https://civitai.com/models/77976/cyberrealistic-negative
•Flux Turbo Lora - https://civitai.com/models/876388/flux1-turbo-alpha
•Flux Turbo - Flux-turbo - v1.0-FP8-Unet | Flux Checkpoint | Civitai
Flux 1Dev only Dark Fantasy - Dark Fantasy (Flux.1D) - v1.0 | Flux LoRA | Civitai
Flux RPG v6 - RPG v6 - Flux 1 - v6.0 Beta 3 | Flux LoRA | Civitai
Lora 2 - https://civitai.com/models/660112/dark-fantasy-flux1d
•Lora 3 – RPG - https://civitai.com/models/647159/rpg-v6-flux-1


This is well done and very informative. I am just starting to learn all these programs and how to use them. This one has been one of the best tutorials I have come across so far. Thank you for your effort.
Wow!! What great work. All the time you spend doing this. Thank you very much.