How to Quickly Install Stable Diffusion in About 3 Minutes
- justthetipwithdani
- Nov 19, 2022
- 3 min read
o, you want to jump on the Stable Diffusion Bandwagon? Well, you're talking to the right guy, let me show you how to do that.
Here a short video but I will break it down on this post to walk you through it when you attempt the installation. Think of this as your notes to reference during the install.
Alls you got to do!
(Take note that most pictures are also links to what they are displaying)
Things to Download
1. Python 3.10.6 (DO NOT download newer versions)


2. GIT - https://gitforwindows.org/
Once you have installed Python v3.10.6 (not the latest), installed the latest version of git, and started the checkpoint download in step 3 you can start the install.
The install!
1. Once Go to the GitHub Repository for Automatic 1111. Click on the Green or Blue code button to access the drop-down box and then click on download Zip file.

Step 2. Great! Now unzip that file somewhere... I don't know, anywhere. It doesn't really matter. You can do this by opening up the zip file and dragging the contents to your desktop or wherever you want it.

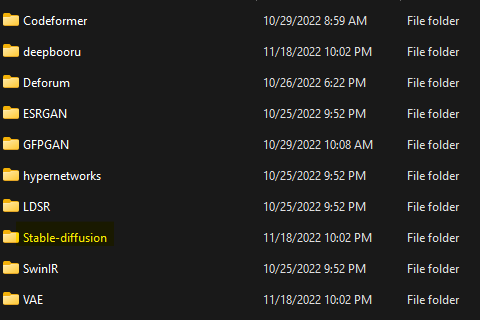
Step 3. Open that file you just unzipped and drag your checkpoints you downloaded from hugging face and throw them in the models folder and then the appropriate sub folder. This checkpoint file "v1.5 pruned emaonly" is for stable diffusion so put it in the stable diffusion sub folder.
This is the Subfolder Stable Diffusion > Models >

This is the Subfolder Stable Diffusion > Models > Stable-Diffusion

Step 4. Alright, now you're ready to blow this popsicle stand. Click on the webui-user.bat (not the webui.bat) and wait for it to install stuff. It will take about 10 minutes. The first thing it will install is PyTorch which will take 90% of the install because it's 3GB. You can install this on the front end if you would like, I will leave more info at the end of this page.


Summary - Download and install Python and GIT, register for a site at hugging face and download checkpoints (numbers 3 and 4 above), create a folder, go to the automatic 1111 repository grab git hub link via code button, create a new folder, go into the address bar and type cmd and cmd prompt will pop up w/ dir already changed to required folder, type git clone and paste the automatic 1111 Github repository html link. now you have a stable diffusion folder, open the stable diffusion - models - Stable diffusion subfolder and then drag the hugging face check points into this folder. Now run webui-user file and wait 10 minutes or so for it to complete it will say models loaded and running on local url 127.0.0.1:7860, use this IP in any browser then you should be running stable diffusion v1.5 now. Use the drop-down box at the top left to choose which checkpoint model you wish to use. Full Stable Diffusion v1.4 install https://www.youtube.com/watch?v=RRybVSmqEiE&t=74s V

Additional info:
If you would like to install PyTorch on the front end if to speed up the install but you will have to go to PyTorchl.org
You will select the most appropriate options for your set up and it will generate code at "run this command", just copy and paste that into python and press enter to run the install.

If you choose to go this route, you have to erase the line of code for torch from the requirements text located in the root folder, see step 4 if you forgot where that is.
You can and should download CUDA drivers if you have Nvidia. These files add another 3+ gigs to the install so that is something to consider. Similar to PyTorch you will be choose the appropriate options based on your system and exe (local) at the end and you will get the download option.

Why would you want Cuda Drivers though? These drivers will speed up your renders and make them lightning quick. They are only for Nvidia and AMD does not have an option. As Stable Diffusion gets more refined it seems Cuda drivers aren't as useful but it is still the meta.
If you haven't noticed by now. This is a windows install and that used to be the only option a couple of months ago. Now AMD users can do this too and there is an installation guide in the Wiki for AMD installs and Mac installs.
Want to see the type of art you can make using Stable Diffusion and Mid Journey? Check out my Deviant Art Site. JustTheTipWithDaniel User Profile | DeviantArt


Comments